PAINTING PORTRAITS IN ACRYLICS
PLEASE BE SURE to check out my new AVAILABLE PAINTINGS page: It is now set up so that you can purchase the original painting OR you can opt to purchase a print in any of several sizes at very reasonable prices!
I could use oils and I may yet, but I have always enjoyed a challenge. I cannot think of a more difficult challenge for an artist than to paint a portrait in acrylics! For now, I will use acrylics just to see if I can do it! So far I have succeeded and that makes me happy!
This portrait is of my young niece. They came for a visit a couple years ago and I took some photos of her in my house and at the beach. I have one of her wearing a really cute hoodie with a cartoon character on the hood, but I decided to paint her without as this is a more formal portrait. I have her photo and tools I used below as well as the step-by-step pictures.
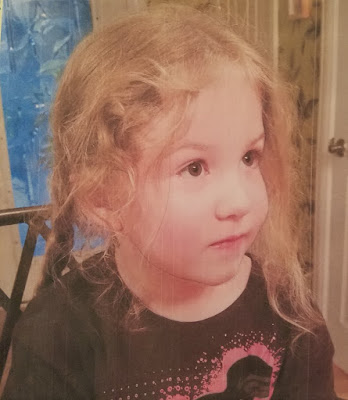
I think Ella is about 5 years old here. I loved this photo especially since she wasn't aware I was taking it. She was concentrating on something her father was saying. Children can look artificial sometimes if they know their picture is being taken. They often will pose or make funny faces!
 I printed the photo on 8.5 x 11 paper and I have a grid on clear film that is marked in 3/8" increments. I prefer 1/4" but I haven't had time to make one yet. You can find grids online and clear film can be purchased at office supply stores. You download the grid and print it on the clear film. Or you can make one with a ruler and very fine marker, but that takes a lot of time and they must be accurate. These are invaluable when doing portraits but only work if your photo and painting are the same size. I also have an art caliper or proportional divider (Amazon) that can be used to enlarge a photo. One end measures the photo and the other end gives you the larger size. It is adjustable for different size canvases too. My painting is 8 x 10 so I just used the grid.

This is the rough in stage of the portrait. I put in the basic colors and a few shadows. When I checked the measurements with the grid the eyes were too low as well as the nose. So I had to correct them. I also had to raise the mouth slightly. Once I had them in the proper spot, I proceeded to work on the next layer of paint. At this point in the painting I started using Liquitex Slo-Dri Blending medium. This product not only slows down drying time, but it allows you to blend the colors much easier than with water alone. Blending is essential for portraits!

I got the eyes in the correct spot, but then I noticed the left eye was too wide. This is why you constantly check the grid and why it is clear. You place it over the photo and note where the lines touch the chin, mouth, nose, eyes, cheeks, ears, etc. Then you place it over the canvas and compare. If the lines don't match, you must make corrections. All these details are what make the portrait look like the individual! If any measurements are off even just a little it can change the overall look so much that it may not look like your subject at all. It is tedious work, but each small correction brings it closer and closer to a correct depiction of your subject. If you get tired, like I did, then walk away for a while, even overnight if need be. This is not quick painting by any means! Some artists take months to complete a portrait! In that time, they will have painted 2 or 3 portraits of them, 2 studies, and the final portrait and that doesn't count the initial sketches and extensive reference photos they may take. That is usually the case for a larger and very expensive portrait.

It is coming down to the finish line. I noticed that the ear was too low and too large so I had to go back and make that correction, plus the jaw line was also slightly off. When I fixed those two things it suddenly began to look like my niece. She has beautiful hair and her wayward curls were so pretty that I wanted to emphasize them in this portrait. Her hair never behaves but it is part of what makes her so cute, besides her sweet personality of course!
I added the final highlights to her hair and darkened the background adding some blues to go with her shirt. When I put in her dark lashes and the fine details around her eyes the portrait came alive! Her eyes are the focal point and they are very expressive. I also liked the touch of white on her lower lip making it look wet and the same in the bottom of each eye. It makes it seem as though she has tears in her eyes. I like that touch. The little hook in her left eyebrow is a distinguishing mark on her face. I almost wish she had pierced ears so I could put a small stud there. It would be so pretty! I put a few final touches of white on her hair for shine and called it done! (You may have noticed that I just made her hair fall straight instead of a braid. I may go back and make it a braid again)
They live in Kentucky so when we went up for the art show I gave it to them. I had it at the show and just told them I had a present, but they had to come to the show to get it! They cried when they saw it. Below is a photo of her beside the portrait. See you next Friday!
I could use oils and I may yet, but I have always enjoyed a challenge. I cannot think of a more difficult challenge for an artist than to paint a portrait in acrylics! For now, I will use acrylics just to see if I can do it! So far I have succeeded and that makes me happy!
This portrait is of my young niece. They came for a visit a couple years ago and I took some photos of her in my house and at the beach. I have one of her wearing a really cute hoodie with a cartoon character on the hood, but I decided to paint her without as this is a more formal portrait. I have her photo and tools I used below as well as the step-by-step pictures.

I think Ella is about 5 years old here. I loved this photo especially since she wasn't aware I was taking it. She was concentrating on something her father was saying. Children can look artificial sometimes if they know their picture is being taken. They often will pose or make funny faces!


This is the rough in stage of the portrait. I put in the basic colors and a few shadows. When I checked the measurements with the grid the eyes were too low as well as the nose. So I had to correct them. I also had to raise the mouth slightly. Once I had them in the proper spot, I proceeded to work on the next layer of paint. At this point in the painting I started using Liquitex Slo-Dri Blending medium. This product not only slows down drying time, but it allows you to blend the colors much easier than with water alone. Blending is essential for portraits!

I got the eyes in the correct spot, but then I noticed the left eye was too wide. This is why you constantly check the grid and why it is clear. You place it over the photo and note where the lines touch the chin, mouth, nose, eyes, cheeks, ears, etc. Then you place it over the canvas and compare. If the lines don't match, you must make corrections. All these details are what make the portrait look like the individual! If any measurements are off even just a little it can change the overall look so much that it may not look like your subject at all. It is tedious work, but each small correction brings it closer and closer to a correct depiction of your subject. If you get tired, like I did, then walk away for a while, even overnight if need be. This is not quick painting by any means! Some artists take months to complete a portrait! In that time, they will have painted 2 or 3 portraits of them, 2 studies, and the final portrait and that doesn't count the initial sketches and extensive reference photos they may take. That is usually the case for a larger and very expensive portrait.

It is coming down to the finish line. I noticed that the ear was too low and too large so I had to go back and make that correction, plus the jaw line was also slightly off. When I fixed those two things it suddenly began to look like my niece. She has beautiful hair and her wayward curls were so pretty that I wanted to emphasize them in this portrait. Her hair never behaves but it is part of what makes her so cute, besides her sweet personality of course!
I added the final highlights to her hair and darkened the background adding some blues to go with her shirt. When I put in her dark lashes and the fine details around her eyes the portrait came alive! Her eyes are the focal point and they are very expressive. I also liked the touch of white on her lower lip making it look wet and the same in the bottom of each eye. It makes it seem as though she has tears in her eyes. I like that touch. The little hook in her left eyebrow is a distinguishing mark on her face. I almost wish she had pierced ears so I could put a small stud there. It would be so pretty! I put a few final touches of white on her hair for shine and called it done! (You may have noticed that I just made her hair fall straight instead of a braid. I may go back and make it a braid again)
 |
| "ELLA" 8 x 10 acrylic |
 |
| Ella with her portrait |

