I want to show you how to paint fog and rain. It is something that many have wanted to do, but unsure how. For the lesson I am using a photo of a foggy cabin that I took when my husband and I traveled the Blue Ridge Parkway. It is in Virginia and known as the homestead of the Martin Brinegar family. They lived there from the late 1800's until the 1940's. The day we showed up, there was fog hanging around the cabin. It sits on a downward slope so that the rain and fog hadn't quite reached it. The photo was stunning and I wanted to paint this scene.
Fast forward to today.. I finally got around to painting this cabin and the atmosphere. I have taken photos as I go along to show you that it's not hard to do. It does take a little practice, but we all need that, right? To get fog, you mix white with a very small amount of burnt umber and blue to make light grey. Get it nice and watery using a #6 or larger bristle brush, (they can take the necessary scrubbing) wipe the brush with a paper towel to take most of the paint out of the brush and test on a scratch board, etc to make sure most of the paint is out. Then start scrubbing in circles moving outward as you go to leave a foggy look over your background. I would suggest you practice this technique on an old painting or a practice canvas before you start on your painting. You can do as many coats as you choose, letting dry between each coat. (It will show up less as it dries) You can also add more trees between coats for more depth if you choose. I painted the background and fog before I started the cabin.
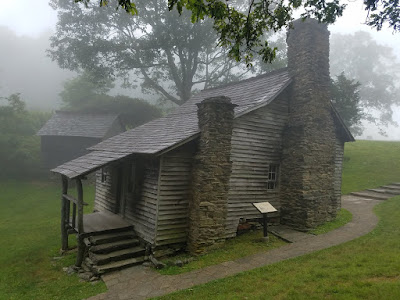
Notice that this is not a log cabin. He built it with lap siding in 1876. The second smaller chimney is part of an addition he added to the original cabin as his family grew. The structure in the background is another addition added later. He had a bedroom and kitchen there as well as cold storage underneath. People back then were very self-sufficient! But I digress...see the fog?
You can see here the background is painted and the buildings are drawn in. I also have the first coat of fog painted in. Do not try to add more fog until the first coat is thoroughly dry or you may scrub a "hole" into your painting. They are fixable, but it's not easy, believe me.
You can see here that I've added a second coat of fog as well as some more trees in the background. I decided to make it a log cabin as these paintings are for an art show in Kentucky where there are still some log cabins. I decided add leaves to the trees before I add a third coat of fog, and I'm also going to add light and smoke to the house; it's early morning. There is no electricity so the light needs to be lower to fit lantern light. I loved the crooked porch posts so I am keeping them! They're hard to see in the photo but they were small trees stripped of bark. I am also going to bring out parts of the fence to the left so you can see a little of the garden.

There's not a lot of difference here but I am showing you this because I added more fog and smoke in the chimney. I decided that the smoke was too dark and there was too much fog to the right of the house. I also decided to eventually add a pathway to the house. There was a door to the house around back. It was the front door originally and it was only 5 foot tall!
I refined the chimneys, added light in the windows, the shadow of the house and even more fog! Go figure.... Notice the flowers on the left? It is supposed to be a depression in the hill, but my husband said it didn't read that way so I took out the "dip" and left the flowers.
You can see the difference with the flowers here and it does look better. Also, I did decide to take out some of the fog so it looks as though the sun is burning off the fog, however, I felt that this painting takes the eye straight to the cabin and it stays there. It should move around the painting and it doesn't. So I went back to work, again!
I am finally happy! I glazed the canvas with gloss varnish. Then I added tree leaves in the top left and a shrub on the bottom left. I toned down the yellow in the grass and darkened the chimneys. I added a bushes behind and beside the cabin and some flowers to bring the complimentary color of red. I also realized that I hadn't added the shadow of the porch. Can you see the difference all this made? Now your eye moves around the painting and the tree and bushes all point toward the cabin as the focal point. It feels complete. I use Liquitex Gloss Varnish in case you want to know. It is for acrylics only, but it gives a wonderful glossy shine to your paintings! I apply it with a sponge brush or a small silicone makeup pad.
I mentioned at the start that I would tell you how to do rain. In this painting I started with a coat of fog, then after it dried, I went back and added little check marks in the puddles and on the umbrella to represent splashes. You can also add dripping water off the umbrella. With a script liner brush and watery, very light grey paint, I added quick straight strokes diagonally over the painting to represent rain. Add a lot but DO NOT make them thick! They must be very thin to work!
I have started my next nostalgic painting, this time it is a little boy and his dog. I have several photos to show the progress here as well. I think you will enjoy it!


