Eureka! I finished (maybe) my latest painting! I say maybe because I have a mentor that I am going to have critique it for me next week. I may have some suggestions from him to implement. But, in the meantime, I will use the "progression" pics to show how I did the painting. This as I mentioned previously, is the larger version of my FL. Panther painting. Of course it's not an exact replica. This one is 20 x 24 and therefore has room for more details. Fun!! I also decided to lighten the background to a foggy or hazy atmosphere. This is common in deep swamp situations, thus making it more realistic.
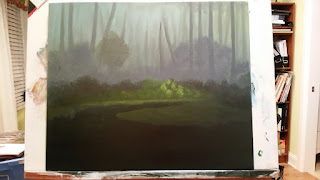 In this first picture, you see my background. Of course, I started by using three coats of gesso, let it dry, then I sanded the canvas with a sanding block of 120 grit. (available at home depot) I then undercoated everything with a darker version of my desired colors. At this stage you can see the undercoat of the bottom half of the canvas. After I put in the sky, I used a light gray-green-brown mix to brush in trees in the background, really just up-down strokes of the brush. Some of these will be highlighted so they are more than suggestions of trees. I also used a dry-brush technique with white and some blue to wash over the background to get the hazy look. The dry-brush technique means you wipe all excess paint off the brush then using circular motion brush lightly to cover the area with a transparent film. Thus the hazy look. If you want to do a large area use a large brush. Small area, small brush. As you can see I decided to make a peninsula here for the cats to lay on. I just liked the look.

Here I drew in the two front cypress trees and the dead log and stump on the right front. I also decided to add a low log going into the water for my turtles to climb on. All this was drawn with a white conte pencil that erases easily.
 I have highlighted some of the greenery, did some preliminary brushing in of sun rays so I would know where to highlight and started the large cypress trees on left. Notice my Ibis nest in background tree? Not yet sure if I'll keep it, we'll see. To do the sun rays, again you use a dry-brush technique but this time you use white with a touch of yellow. A VERY dry brush and using long strokes brush LIGHTLY until you get the desired effect. Don't make the area solid. Sun rays are affected by trees, limbs, leaves, etc. so they are broken and separated. A little goes a long way, don't overdo!

Now, I highlight the grass on the foreground area for the cats, highlight the cypress trees and started the log on the right. the grass is so bright because the sun is shining directly on it. I added bushes on the right and made a path down to grass area for cats to move down.
 I have now added the stump and small log for the turtles. I also widened the back cypress. It was too narrow for my liking. In proper composition technique, everything must lead the eye to the focal point, so I added a limb on the side of the small log to subtly point toward the cats. Notice the dead tree also subtly points toward the center.

I did a different technique on the two cypress trees. I added extra thick paint to both then took the back end of a small brush and scratched thru the paint to make tree texture. It is really cool to do but must be on a close-up tree or fence post, etc in order to work well. I highlighted the stump and logs adding moss and holes, etc. Holes are easy, just touch with very black paint. (make it with equal parts dk green, blue, burnt umber, and a touch of diox purple) Be careful not to add any white or it loses it's blackness! Now I am ready to start the mama cat.
 I blocked her in here. ( I went thru a book I have on how to draw cats, found the pose I liked and then drew it on the canvas) After that I start adding highlights to make her 3-D using photos and pictures of cats from my reference books. Let me just say here that if you want to be a serious landscape artist, you need to start a reference library! I have 4 tall bookcases full of photos and books I have collected from thrift stores and photos I have taken, etc. Again, never copy exactly any photo not taken by you without permission!
 She is not complete at this point, but well on the way. Notice how bright she is from the sun? I added some spanish moss to the small log and background trees. This is the everglades after all. LOL!! I also added mama cat's reflection in the water and some grasses also. I strengthened the reflection of the stump and logs in the water.
Also added reflection of the grass in background and front areas.

Mama is pretty much finished now. I LOVE her expressive eyes!! A friend said she reminds him of the "Big Eyes" paintings. Me too. I added her shadow and shadow to the log. Shadows are VERY important, never forget to put them in! They are what can make or break a painting! They "seat" your objects so they don't float and they add realism, So Important!

 It is always good to walk away from your painting for a little while. When you come back you can see mistakes to correct and I did. The big trees were too dark and overbearing so I lightened them. Now they look much better. I also added a large tree on left as an eye stopper on that side, and I added the turtles. I usually do things in odd numbers. Looks better that way. Now for the babies!
Okay, I said I USUALLY add things in odd numbers. Sorry, I couldn't resist three babies.
This is difficult. They aren't showing up well against mama, even though they have spots and she doesn't. Notice the two birds? In front is a great grey Egret. Mama is full so she's not interested. Babies on the other hand are all alert! Also, I decided to keep the Ibis nest and add daddy flying to them. But, he is hazy so he doesn't take your eye away from the focal point!
Don't forget the reflection of the Egret in the water! I did for a while..
 Still haven't put in the bird's reflection, but I finally got the babies to show up from a distance of 6 feet (average distance for viewing a painting) I had to darken the mama and lighten the babies, opposite of normal! Even their spots didn't work by themselves. I also moved their tails from the original positions I had them in. They cut up mama too much. Little details can make a big difference. If you look closely, I added teeth to the front baby! I then added grass and water lines around the bird and throughout the area. I also added the reflection of much of the grass in the water. I added the turtle highlights too. Two last things, I shortened the limb on the small log with turtles, I didn't like the length of it. And I opened up a path into the background. You probably didn't notice it, but it allows the eye to move through the painting better instead of getting stuck in the foreground. That's very important! Notice that I haven't signed it yet. I will have it critiqued by other artists first. Always a good idea! They can see what we may miss.
I am now working on a "portrait" of a Florida Panther! Head shot only. It is so cool! I think I have panthers on the brain now!!
 In this first picture, you see my background. Of course, I started by using three coats of gesso, let it dry, then I sanded the canvas with a sanding block of 120 grit. (available at home depot) I then undercoated everything with a darker version of my desired colors. At this stage you can see the undercoat of the bottom half of the canvas. After I put in the sky, I used a light gray-green-brown mix to brush in trees in the background, really just up-down strokes of the brush. Some of these will be highlighted so they are more than suggestions of trees. I also used a dry-brush technique with white and some blue to wash over the background to get the hazy look. The dry-brush technique means you wipe all excess paint off the brush then using circular motion brush lightly to cover the area with a transparent film. Thus the hazy look. If you want to do a large area use a large brush. Small area, small brush. As you can see I decided to make a peninsula here for the cats to lay on. I just liked the look.
Here I drew in the two front cypress trees and the dead log and stump on the right front. I also decided to add a low log going into the water for my turtles to climb on. All this was drawn with a white conte pencil that erases easily.


Now, I highlight the grass on the foreground area for the cats, highlight the cypress trees and started the log on the right. the grass is so bright because the sun is shining directly on it. I added bushes on the right and made a path down to grass area for cats to move down.
 I have now added the stump and small log for the turtles. I also widened the back cypress. It was too narrow for my liking. In proper composition technique, everything must lead the eye to the focal point, so I added a limb on the side of the small log to subtly point toward the cats. Notice the dead tree also subtly points toward the center.
I did a different technique on the two cypress trees. I added extra thick paint to both then took the back end of a small brush and scratched thru the paint to make tree texture. It is really cool to do but must be on a close-up tree or fence post, etc in order to work well. I highlighted the stump and logs adding moss and holes, etc. Holes are easy, just touch with very black paint. (make it with equal parts dk green, blue, burnt umber, and a touch of diox purple) Be careful not to add any white or it loses it's blackness! Now I am ready to start the mama cat.

 She is not complete at this point, but well on the way. Notice how bright she is from the sun? I added some spanish moss to the small log and background trees. This is the everglades after all. LOL!! I also added mama cat's reflection in the water and some grasses also. I strengthened the reflection of the stump and logs in the water.
Also added reflection of the grass in background and front areas.

Mama is pretty much finished now. I LOVE her expressive eyes!! A friend said she reminds him of the "Big Eyes" paintings. Me too. I added her shadow and shadow to the log. Shadows are VERY important, never forget to put them in! They are what can make or break a painting! They "seat" your objects so they don't float and they add realism, So Important!

 It is always good to walk away from your painting for a little while. When you come back you can see mistakes to correct and I did. The big trees were too dark and overbearing so I lightened them. Now they look much better. I also added a large tree on left as an eye stopper on that side, and I added the turtles. I usually do things in odd numbers. Looks better that way. Now for the babies!
Okay, I said I USUALLY add things in odd numbers. Sorry, I couldn't resist three babies.
This is difficult. They aren't showing up well against mama, even though they have spots and she doesn't. Notice the two birds? In front is a great grey Egret. Mama is full so she's not interested. Babies on the other hand are all alert! Also, I decided to keep the Ibis nest and add daddy flying to them. But, he is hazy so he doesn't take your eye away from the focal point!
Don't forget the reflection of the Egret in the water! I did for a while..
 Still haven't put in the bird's reflection, but I finally got the babies to show up from a distance of 6 feet (average distance for viewing a painting) I had to darken the mama and lighten the babies, opposite of normal! Even their spots didn't work by themselves. I also moved their tails from the original positions I had them in. They cut up mama too much. Little details can make a big difference. If you look closely, I added teeth to the front baby! I then added grass and water lines around the bird and throughout the area. I also added the reflection of much of the grass in the water. I added the turtle highlights too. Two last things, I shortened the limb on the small log with turtles, I didn't like the length of it. And I opened up a path into the background. You probably didn't notice it, but it allows the eye to move through the painting better instead of getting stuck in the foreground. That's very important! Notice that I haven't signed it yet. I will have it critiqued by other artists first. Always a good idea! They can see what we may miss.
 |
| "THE LAST SANCTUARY" by Dara Dodson 20 X 24 Acrylic |
I am now working on a "portrait" of a Florida Panther! Head shot only. It is so cool! I think I have panthers on the brain now!!

